Showing posts with label sweets. Show all posts

Tuesday, August 30, 2011

Gluten Free Brownies with Walnuts

So, again, I've been meaning to get into more gluten-free baking, but some commonly-used ingredients are expensive and/or hard to find.  I was surprised to see at my local Jon's recently these particular nondescript shakers (I've gotten everything from za'atar to flaxseeds in these shakers).

 Now, I know that serious gluten-free baking would need to use more reassuringly gluten-free ingredients (like Bob's Red Mill or something).  But let's be honest, the ghost of glutinous baking projects past is probably haunting every corner of my kitchen; it'll never be totally pure.

I'd also like to point out the prices of these items, AND the fact that I also purchased "Awesome Bleach" that day.

Anyway, weeks passed and nothing happened to my weird little cannisters.  I also had a pound of dates still sitting in my fridge from when I made the crust for the frozen raspberry cashew cake last month.  And then a recipe comes along that calls for exactly what you have!  Well, except for the cherries in Chocolate Chip Cherry Brownies.

In replacing the 1 cup of cherries, I thought about maintaining the same approximate amount of sweetness, pectin, and just plain bulk.  I ended up using 1/4 c additional dates and 3/4 c walnuts.  Sadly, I didn't have quite enough chocolate chips, so I ended up just melting the entire 1 3/4 c that I had, rather than melting 1 1/2 c and folding in an additional 3/4 c later.  I also used soymilk instead of almond milk, and I chopped and soaked the dates in the milk before processing to give them a head start.

I love the idea of using a date-and-milk puree as a base!  The pectin in the dates makes the liquid so thick.

The batter tasted pretty great; it was incredibly sticky and fudgy.

And indeed, the finished product, straight out of the oven, was also fudgy and delicious.  The next day, though, the texture was a little bit dry and mealy.  I'm going to try reheating them, but I think these are best eaten right after baking--which has nothing to do with their lack of gluten--what brownie doesn't taste best when it's still warm from the oven?

Gluten Free Brownies with Walnuts
(adapted from manifest vegan)

Ingredients
about 16 dates
1/2 c nondairy milk
1 tsp vanilla extract
2 1/4 c non-dairy chocolate chips, divided
1 c superfine brown rice flour
1/3 c potato starch
1 tsp salt
3/4 c walnuts, toasted

Instructions
1. Soak the dates, coarsely chopped, in the nondairy milk.  Preheat oven to 350*.  Oil a an 8 x 8 inch baking pan.
2. Combine pitted dates and non-dairy milk, and vanilla into food processor and puree until very smooth.
3. Over double boiler, melt 1 1/2 c chocolate chips. Pour the melted chocolate into the date mixture and blend again until super smooth. 
4. In large mixing bowl combine  brown rice flour and potato starch and salt
and mix until well combined. Fold in remaining chocolate chips and toasted walnuts.
5. Transfer to pan.  Bake for 20-25 minutes, then allow to cool before cutting into squares and serving.

Sunday, July 10, 2011

Frozen Raspberry Cashew Cake

Last week I threw a little dinner party for some nonvegans and got a bit carried away.  I think part of the reason I got so excited about vegan cooking in the first place was the challenge of it.  Add to that some guests who didn't want to eat gluten or vinegar, and hey, while we're at it, I thought, why don't I avoid nightshades, too?

It ended up being a four-course meal:


Red Lentil Sesame Fritters (used rice instead of bulgur this time)

Green Salad with Green Beans, Radish, and Grapefruit-Lime Vinaigrette

Frozen Raspberry Cashew Cake (below!)

*

Apparently "palate cleanser" near-excuses "boring" (cf. "green salad...").  But onto cake.


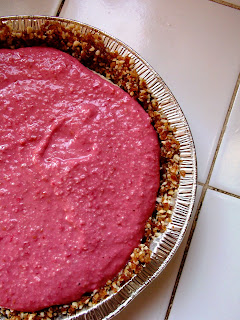
This cake--I don't want to call it cheesecake, although it's clearly cheesecake-inspired--is raw and gluten free.  Um, yay.  It's also just delicious.

Sooo you got yer crust: it's just dates and almonds (and salt).  There's a strawberry-chocolate pie in The Joy of Vegan Baking (wow, just realized I never use that cookbook anymore) that has a crust like this too; it's pretty magical how simple it is.  I think a little cinnamon or nutmeg or cloves might be nice in there, too.


The creamy filling uses coconut oil.  I realized that nothing else was going to do, so I finally bought my first jar.  And actually, at Whole Foods, it wasn't as bad for the wallet as I thought it would be.  This large jar was $7, and it's a whole lot of fat in there.


This recipe only used 1/3 cup.  The stuff looks a TON like Crisco, that now-much-maligned shortening in a tub that was a constant staple in the kitchen when I was little.  I think the coconut oil has a slightly lower melting point, though, because it was really hot in my kitchen and it started melting... so "solid at room temperature" definitely depends on what room we're talking about.  I got the "refined" kind, which has a higher smoking point and no coconut odor/flavor.  I kept expecting (and wishing) it would smell coconutty, though.


This is a cake you really have to plan in advance for.  First, you need to soak the cashews at least 5 hours before making the filling.  Then, after you assemble the pie, you need it to firm up in the freezer.  And then, unless you time it perfectly, it needs to leave the freezer for a short while to get slightly softer again.  Yeah... no guar gum here, but the fact that coconut oil gets softer when it's warmer helps here.

Filling, layer one:


+

=


I was a bit nervous about this cake, because I had to use my mini-food-processor, in which I often make pestos or onion pastes.  In fact, I had just used it for that in making the onion paste for the Green Pea Soup.  And I'm all too aware of how quickly the smallest hint of onion or garlic can ruin a sweet thing (cf. Almond Butter Cream).  But I soaked all the components in baking soda and water, then washed them thoroughly with soap, and it was fine.  It just took a LOT of grinding in my sad little food processor to get it creamy enough.

The finished product was really tasty.  There was a lot of lemon juice to make it tangy, but vanilla and raspberries were also well represented.  I think 1/3 c agave was actually a bit too much (I'm an agave newbie and skeptic; I recently had a confrontation with it on this blog).  Still, this dessert was deceptively light and refreshing.  In fact, to say that it serves 8-10 feels like a bit of a stretch because we cut it in 8 pieces and could have definitely had larger pieces.  Yum.

I don't have a spring-form pan, so I used an 8-in aluminum (disposable) pie pan, because you can bend it to get the fragile pie out more easily.

Frozen Raspberry Cashew Cake

Ingredients
Crust
1/2 c raw almonds (pecan or walnuts will also work)
1/2 c soft Medjool dates (the dates I found at Jons were Deglet Noor dates from Tunisia; I pre-chopped them for easier processing)
1/4 tsp sea salt
consider also: cinnamon, nutmeg, or cloves
*
Filling
1.5 c raw cashews, soaked in water for at least 5 hours, overnight is best
juice of 2 lemons
the seeds of 1 whole vanilla bean (or 1 tsp alcohol-free vanilla extract)
1/3 c raw coconut oil
1/3 c agave nectar (or honey if not vegan)
1 c raspberries (thaw completely if using frozen)

Instructions
1. Place nuts and dates in a food processor with sea salt and pulse to chop until they are to your desired fineness (process a finer crust longer than a chunky one). Test the crust by spooning out a small amount of mixture and rolling it in your hands. If the ingredients hold together, your crust is perfect. Scoop out crust mixture in a 7” spring-form pan (if you don’t have a spring-form pan, use a pie plate lined with saran wrap--see notes above), and press firmly, making sure that the edges are well packed and that the base is relatively even throughout. Rinse food processor well.
2. Warm coconut oil and agave nectar in a small saucepan on low heat until liquid. Whisk to combine.
3. In the most powerful food processor / blender you own (you decide which one has the most torque) place all filling ingredients (except raspberries) and blend on high until very smooth (this make take a couple minutes so be patient). If you have a Vita-Mix, absolutely use it.
4. Pour about 2/3 (just eyeball it, you can’t make a mistake!) of the mixture out onto the crust and smooth with a spatula. Add the raspberries to the remaining filling and blend on high until smooth. Pour onto the first layer of filling. Place in freezer until solid.
5. To serve, remove from freezer at least an hour prior to eating. Run a smooth, sharp knife under hot water and cut into slices. Serve on its own, or with fresh fruit. Store leftovers in the freezer if it will be a while until you eat it, but if you will eat it the following day, the fridge is great! (what leftovers? seriouslyServes 8-10.

Friday, July 8, 2011

Agave

AAHHHH! GAHHH.

[Oy] vey.

This is how I am feeling about agave.  I think it is possibly the most overrated health food trend yet.  Well... acai is pretty silly too.

Anyway, I wanted to cook "super healthy" for some dinner guests recently, so I was like, maybe I can use agave instead of sugar or honey.

So I went to TJ's, got my cute little bottle of raw (oooooh raw!) blue agave, took it home... and then looked at the honey I had in the cupboard.  (Yes, I have honey.  Please don't get mad at me, vegan police.)


Wait... so the same serving of agave actually has more calories and more sugar?  That doesn't seem particularly "healthy choice"ish...

But I'd heard that agave was "supersweet and you needed to use less of it."  Well, I looked that up, and it seems that while that's true for regular ol' granulated sugar, honey and agave are actually pretty equivalent.  And since this agave is actually sweeter per serving than the honey, even if you used considerably less of it (which it seems like you shouldn't), it still wouldn't be lower sugar than the honey.  Anyway, what does "sweeter" really mean if not "actual amount of sugar"?  And if "sweetness" does just mean "actual amount of sugar," isn't this all sort of like asking what's heavier, a pound of bricks or a pound of feathers?

Ok... but I'd heard that agave is low-glycemic.  Ugh.  These numbers seem to vary a lot from unofficial website to unofficial website to unofficial website.  Are people just pulling these numbers out of their asses?  If it varies so much from website to website, does the smaller difference between agave and other sweeteners actually matter that much?  And anyway, while it would be nice to think you're avoiding blood sugar spikes, shouldn't you maybe just not eat that much sugar, period?

Then, as we fall farther down the rabbit hole, there's fructose.   Even though it sounds like "fruit," fructose doesn't seem to be particularly awesome.  High fructose corn syrup is also mostly fructose (duh).  So is fruit.  So is agave.  So is most sugar, it seems, besides brown rice syrup (maltose), which hasn't been trendy since the superdupermacro hippies found it in the 70s.  And again, these ratios vary incredibly from shitty website to shitty website.  Maybe there's more fructose (in ratio to sucrose or glucose) in agave than in granulated sugar.  I'm not sure.  And I'm no longer sure that I care.

Then, at the bottom, there's my favorite: "raw."  Now, as this blog surely makes clear, I'm totally a fan of minimally-processed foods.  But people can't even seem to agree on how processed agave is.  Just because it's processed at a low temperature--which gives it that enticing "raw" label--doesn't mean it comes right out of a cactus.  In fact, it certainly takes more processing than honey does.

Where is the reliable nutrition information on this question??  For every person who's really excited about agave, there's a naysayer out there with an equally sensational and unconvincing website.  Here are a few interesting ones:

I'm leaning towards the opinion that the agave craze is a load of trendy bunk.  And even if there is some truth to the fact that agave is better than granulated sugar, if not honey--and I respect that many vegans don't want to eat honey--surely the real bottom line is, just don't eat that much sugar.  That includes honey, agave, fruit juice, molasses, etc.  There comes a point when sugar is sugar.  Maybe you metabolize different kinds slightly differently, and yes, every person's body is different, but this is all still literally (and I don't mean this kind of "literally") sugar, and people who market super-sweet foods containing agave, honey, or fruit juice as "sugar free" aren't just assholes, they're also lying.

Now, to maybe take away from the "sugar is sugar" stance, unrefined honey and blackstrap molasses have crazy nutritional value.  Antimicrobial, antioxidant, vitamins and minerals...

...But at the end of the day, I'm going to choose my sweetener by the following criteria:

5) What's already in the recipe I'm using
4) What's cheaper and/or more ethical (i.e., I can get locally made honey for the same price as fair-trade granulated sugar)
3) Whether I'm cooking for someone who has a strong preference
2) The texture I want
1) The flavor I want

Berry Cornmeal Muffins

I've been trying to cut some of the gluten out of my cooking, mostly for the lil lady.  When I get back from spending most of July in London, I'm going to invest in some of that fancy schmancy stuff like spelt flour, brown rice flour, xantham gum, etc... but for the time being, oatmeal and cornmeal have been great friends.

(ok, yes, there is controversy about whether and when oats are gluten free)

(unfortunately it's not like this controversy)

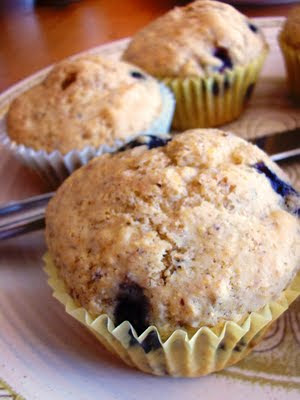
This muffin recipe (which I found just by gooooogling) uses less wheat flour because it uses some cornmeal.  Baby steps.  Also, delicious.  I'm still using the fruit from the commercial shoot that Sarah worked on last month; this time, it was blueberries.  This muffin would have been a little bit dense and dry if it weren't for the luscious blueberries in every bite.  They were actually really great, especially with a bit of earth balance on them.

I subbed in 1/2 c wheat flour (and used 1 c white flour for the remainder).  I also used a flax egg instead of a chicken one, soymilk instead of dairy milk, and turbinado sugar instead of white sugar.  Using frozen berries meant that the muffins took considerably longer to cook (about 7 min more); the key is to watch and test frequently, even if it means that some of the muffins will have holes in them from your testing.

Berry Cornmeal Muffins

Ingredients
1 c white AP flour
1/2 c whole wheat flour
3/4 c cornmeal
1/2 c sugar
4 tsp baking powder
1/4 tsp salt
zest of one lemon
1 c fresh or frozen berries (blueberries, raspberries, and/or blackberries)
1 egg (1 TB ground flax + 3 TB water, allow to sit for 10 minutes before using)
1 c nondairy milk
1/4 c canola oil
1 tsp vanilla extract
2 TB turbinado sugar

Instructions
1. Preheat oven to 400*  Butter or spray with a non stick cooking spray 12 muffin cups. Can also line with paper liners.
2. In a large bowl combine the flour, cornmeal, sugar, baking powder, salt, and lemon zest. In a separate bowl combine 2 TB of this mixture with the berries.
3. In a large measuring cup or bowl whisk together the egg, milk, oil, and vanilla extract. 
4. With a rubber spatula fold the wet ingredients into the dry ingredients and stir only until the ingredients are combined. Gently stir in the berries. Do not over mix the batter or tough muffins will result. 
5. Evenly fill the muffin cups with batter, using two spoons or an ice cream scoop. Sprinkle with the sugar.
6. Place in the oven and bake until lightly browned and a toothpick inserted in the center of a muffin comes out clean, about 15-20 minutes (I used frozen berries and it took closer to 25-30 min). Transfer to a wire rack and let cool for about 5 minutes before removing from pan.  Makes 12 regular sized muffins.


*

Oh hey, we also made more tempeh sausage like this.

Monday, July 4, 2011

Veganomicon Cookies

More recipes are on their way, I promise!  Just not today.

Because of some particular people I know and would like to bake for, I've been meaning to get into gluten-free baking for quite a while.  Unfortunately, most gluten-free baking ingredients are both more expensive and harder to get hold of than your typical glutentastic all-purpose flour.

Oats are a notable exception to these issues.  Now, I'm well aware that oats aren't exactly gluten-free, depending on both whose oats and whose bellies are concerned.  Still, it was an easy step in that direction (spelt flour, which I've only worked with once, would be another baby step).

So, I made these chocolate chip oatmeal cookies from Veganomicon.  They expanded a ton, and were crispier and more delicate than traditional cookies.  If you're making your own oat flour out of oatmeal, be sure to measure the oats after whizzing them around in the food processor, because they will definitely lose volume in the process.


"Wheat-Free Chocolate Chip Cookies" from Veganomicon

*

Speaking of Veganomicon cookies (of the gluten-full kind), I also made these chocolate chocolate chip cookies from the same cookbook after reading about them on eggless cooking.  I used chopped almonds instead of walnuts because a certain chocolate cookie monster doesn't like walnuts.  These were delicate and fudgey, but they got stale rather quickly.


based on "Chocolate-Chocolate Chip-Walnut Cookies" in Veganomicon

*

And... a random dinner: vegetable sushi (with carrots, avocado, chives, and cucumber filling), sauteed kale (with garlic, ginger, lemon, sesame oil, and sesame seeds), and Celeste's mushroom leek soup.


Sunday, July 3, 2011

Chocolate Sorbet

When I go to Scoops, I always pass over the sorbets and head right for the rich and creamy soy- or coconut-based ice creams.  When there are other choices, why would I choose something that feels like the impoverished version of ice cream?  Something that is elsewhere my only vegan option?  And it often feels as though ice cream places know their sorbets are less exciting, because they overcompensate for the boringness by making them far too sweet.  Hm.  No thanks.

But.  There's an exception.  (who knew I had so many rules about frozen treats!)  I also scoff at chocolate ice cream, because it's never chocolatey enough.  I'm someone who never went for milk chocolate over dark chocolate even before going vegan.  And as it turns out, sorbet is the answer.  Yeah, it has (nonGM) corn syrup and a healthy serving of emulsifiers (?), but Double Rainbow's chocolate sorbet (sold at Trader Joe's) is totally awesome.  Pretty much nothing but cocoa and sugar, and yet (because its so flavorful and so cold) as satisfyingly chocolatey as a bar of dark chocolate.  It's like the best fudgsicle you ever had, without all the nasty crap.  Virtually fat-free, blah blah blah... I feel like this is an advertisement!  But really I'm just noting an epiphany that I had.  Maybe sorbet isn't always characterized by deprivation or overcompensation.

Also, if you have an ice cream maker, Hannah at Bittersweet just posted a recipe for chocolate sorbet.

Sunday, June 12, 2011

Blackberry Pie

Some of all that frozen fruit (mostly blackberries, but also some strawberries) went into making this pie.  I love how few ingredients a pie can have and still come out just right.  The filling: fruit and cornstarch (and maybe sugar).  The crust: flour, oil, and salt.  Seriously!

I loved this pie (especially once it firmed up--it was better the second day).  The filling just had this really dense and tart berry flavor, and the whole wheat flour gives the crust a fantastic texture.  We ate it with coconut bliss ice cream, which I think is the only grocery store vegan ice cream worth getting.  So good... and it, too, only has three ingredients: coconut milk, agave, and vanilla.

Mixed Berry Pie with Whole Wheat Oil Crust
Whole Wheat Oil Pie Crust

Ingredients
1 1/4 c white flour
1/2 c whole wheat flour
1/2 c vegetable oil
1 tsp salt
3-4 TB of cold water

Instructions
Preheat oven to 375.  Combine flour, oil, and salt.  Add water until you have dough.  Roll dough between 2 sheets of waxed paper, on top of a slightly wet countertop.  Transfer to a 9-in pie pan; extra crust can be rolled out and cut into fun shapes or thin strips as a topping, or cooked off in a frying pan as a snack, or frozen for later use.  Poke crust with a fork and bake 15-20 min.  I suggest placing a sheet of parchment paper over the crust and weighting it down with dry beans; this helps the crust keep its shape.  Remove crust from oven and set aside until you're ready to fill it.

*

Mixed Berry Pie Filling
Ingredients
LOTS of berries (far more than you think you need)
0-1/2 c turbinado sugar (to taste)
1/4 c cornstarch, mixed with a bit of cold water
2 TB lemon juice

Instructions
In a saucepan, cook fruit with some water until it begins to soften. Add remaining ingredients and cook for a few minutes, until well mixed. Transfer to pie crust. Top with reserved crust pieces and brown sugar, if desired.  Bake pie at 425* for ten minutes, then at 350* for an additional 40-50 minutes, until filling is bubbling and crust begins to brown. Allow to stand and cool before serving.  It will seem way to mushy to be done, but if you let it sit and cool for at least a few hours, it will firm up just fine.

*

Reference cupboard: conversions, "bean math," legume and grain cooking times and water ratios.

Friday, June 10, 2011

Muffins and Sausages


My girlfriend Sarah (wait?  does she mean girlfriend?) recently worked on a commercial shoot that involved craploads of fresh fruit... which wound up in my fridge!  It was a little overwhelming for a bit there: tons of strawberries, blueberries, and blackberries, ten mangos, two pineapples, and ten bananas.

But, freezers are our friends!  I washed, trimmed, chopped, and froze almost all of it--the equivalent of many dollars of frozen fruit, just waiting for smoothies, pies, curries, breads, etc.  Yay!


First thing I did with the fruit that didn't get frozen was make some muffins... I used the recipe for berry muffins in Vegan Brunch, but too much multitasking was going on, and I know I messed it up somehow (3 c of flour instead of 2, maybe?), because I had to add a LOT of milk to get batter consistency.  I know using fresh berries instead of frozen also affects the cooking time, but it was more than that.  I wasn't thrilled about the results (though Sarah said they were just fine), but we nevertheless ate them or gave them away quickly enough that I didn't get a decent photo.

Muffin Carnage

*

Pancakes from Vegan Brunch have also continued to happen, with great success.  Sometimes they have blueberries in them.


*

On the topic of breakfast, I recently made an impulse buy at wholefoods and got a pack of Field Roast's Italian sausages.  Now, I pretty much never buy "fake meat products" (tofu and tempeh are different, since they have one ingredient).  But I looked at the list of ingredients and thought, I could make this exact sausage at home.  It's simply wheat gluten, vegetables, and spices.  So that's cool... and the sausages taste really great... but they sort of sit in the bottom of my stomach for hours, as if my body isn't sure it can actually digest them.  Is it a gluten thing?  I'm inclined to pooh-pooh the hordes of upper-middle-class white people who only as of very recently imagine that gluten has singled them out as torture victims (as if insisting on soymilk and egg-whites-only-omelettes was no longer enough to make them special)... but yeah, something about these sausages doesn't sit well with me.  Not that this keeps me from ordering one (at a 500% markup) every time I go to Blue Palms for happy hour.

Still, unless I'm feeling really lazy, I could make my own.  Or I could skip the gluten bomb altogether and return to my standbys of tempeh sausage filling, tempeh sausage triangles, and the amazing oat and rice sausage.

Field Roast Italian Sausage, lightly fried, with sprouted rye bread and raspberry jam in the background

And yes, I know the title of this post is "muffins and sausages."

Thursday, April 21, 2011

Agar Shots

This post is tagged under "sweets" and "beverages," but it's neither sweet nor exactly a beverage.  I'd been curious for a long time about this North American delicacy called the Jello shot, which is apparently consumed at festive occasions to produce a state of intoxication.  Actually, I was just trying to think of other things to do with agar, having already used it in kantens and in panna cotta.

The good (?) news: yes, you can make alcoholic jello out of agar.  The bad news: this tasted really bad.  Really bad.  I think it needed far more sugar, and a different kind of juice would have made that easier.  I used 1.5 TB sugar, which was definitely not enough, considering you're balancing out not only the lemon juice but also the booze.

I also don't have shot glasses.


Agar Shots (Lemon)

Ingredients
1/2 c lemon/orange juice
1/2 c water (or less?)
1/4 c sugar (or to taste)
1.5 TB agar flakes (or more?)
1/2 c ice cold vodka

Instructions
1. Heat the juice, water, and sugar, dissolving the sugar.
2. Reduce heat, then add agar flakes.  Cook about 5 minutes to dissolve agar.
3. Set aside, let cool, and then mix with vodka.  Chill in the fridge for an hour or so.  Serves about 4.

Thursday, March 31, 2011

Cherry Kanten with Cashew Cream

I went home for spring break last week.  I saw and experienced many things, including figuring out where to find the "Cheapest GOAT MEAT in Town!!" (see right).

And I cooked quite a bit, but mostly reruns, including Celeste's brussels sprouts / fennel / mushroom dish, that warm chickpea and artichoke salad, and a few Indian dishes (below), with which we also had some coconut cardamom panna cotta.


From upper left: spinach salad; cheater chana masala; brown basmati rice with onion, garlic, cumin, turmeric, peas, and almonds; baingan bharta

And here's a rare photo of my brother, my mom, and me about to enjoy the above-mentioned foods:

The one totally new thing I made was a kanten, using some of the agar left over after making coconut panna cotta (more about agar in that post, too).  Now, if you've already made one of these, it might not be too exciting, but I am so tickled by how you can make really delicious, gelatin-free jello out of fruit juice!  The possibilities are endless, I thought, as I stood in the juice aisle at the grocery store trying to decide.  I ended up going with cherry juice, and it was awesome.

This is so easy, it's hardly a recipe.  You boil juice, add agar flakes, reduce heat, simmer and stir for 5 minutes, then pour into cups and chill.  It firms up in about an hour.  Use 1 TB agar flakes per 1 cup juice. 

The cashew cream was equally simple: soak cashews in water, then puree them with a little of the soaking water.  Add sugar and maybe vanilla, and whip it up a bit more.

Friday, March 18, 2011

Almond Lime Coconut Cookies

Check out these cookies from ecurry made with equal parts flour and almond meal.  I think it's really cool that you can make them on the stove (!), but I found them to be a bit unsatisfying.  I'd have like more butter, or vanilla, or something.  In fact, for a similar cookie, I'd probably turn instead to these amazing almond cookies or the rum walnut cookies.

However, the coolest part of this recipe wasn't even the stovetop thing; it was the lime sugar: after grinding sugar together with lime zest in a clean coffee grinder, I had magical green sugar with an intense lime flavor!  This is a groundbreaking discovery.


Indian Lime Cookies
(from ecurry)

Ingredients
1/4 c fine almond meal (I blanched and ground up raw almonds)
1/4 c all purpose flour
1/4 c powdered sugar
1.5 TB ghee or melted butter
1 TB milk/cream
1 tsp lime or lemon zest
1 tsp fine sugar
coconut flakes to garnish the top (optional)

Instructions
Mix together almond meal, all purpose flour, half the zest, confectioners’ sugar, cream/milk and ghee. Work the dough until it comes together, and no longer crumbly. Pound together the rest of the zest and the superfine sugar. This will be a lime colored sugar.
Divide the dough in to 8-10 portions. Flatten them between the palm of your hands to form discs about an inch in diameter. Carefully place each cookie on a baking sheet, and flatten the cookies with your finger – to 1.5-2 inch diameter. Top with a sprinkle of lime sugar and nuts (if you are using them).
In a pre heated oven at 350 degree F, bake for 8-10 minutes or until the edges get light golden. (in my convection oven, the cookies were done in 6-8 minutes).Place the cooked cooking on a cooling rack or plate. The cookies will crisp once they are cool.
To cook the cookies on stove top:
Work in batches; make flatten four balls of dough to 1 inch discs and place them on a cold nonstick frying pan. Using your fingers, flatten them further so they are as thin as possible, about 1.5 -2 inches in diameter. Top with a sprinkle of lime sugar and nuts (if you are using them).
Place the pan over stove and cook over very low heat for 7-8 minutes. Once the base is light golden, flip them over with a spatula and cook this side over very low heat for about 4 minutes. Try not to let this side turn brown or even golden. Place the cooked cooking on a cooling rack or plate. The cookies will crisp once they are cool. Work with the second batch in the same way.

Saturday, March 5, 2011

Coconut Cardamom Panna Cotta

I bought me some agar flakes months ago, thinking, "Surely this is a necessary component in the well-stocked kitchen!"  Agar is very exciting.  It comes from algae and is actually superior to gelatin in other ways than its mere veganocity: for one, it seems that agar has a higher melting point.  And of course, it's also way more fun to say.

I proceeded to not touch my new agar at all.  What could you use it for, besides the ubiquitous kanten, a sort of fruit-juice jello?

Then, weirdly, two similar recipes came my way nearly simultaneously.  Panna cotta, formerly doubly unvegan (cream and gelatin), here appears in the form of coconut milk and agar.  Genius!  It's aromatic and rich, yet also refreshing, a great finish to this spicy and hearty meal.

I went off this recipe from hot knives, but I omitted the vanilla beans and long pepper in favor of cardamom and vanilla extract.  I'd also like to try this other recipe, which uses ginger tea and cinnamon.

Coconut Cardamom Panna Cotta
(adapted from hot knives)

Ingredients
1.5 c coconut milk
little sploosh vanilla extract
a sprinkle of cardamom
1/2 c honey (or agave)
4 g agar agar (about a tablespoon? maybe less?  I just winged it)
1 c water
cinnamon and cayenne for dusting (optional)

Instructions
1. In a saucepan over low heat, combine coconut milk, vanilla, cardamom, and honey.  Mix well, then remove from heat and cool.
2. In a saucepan, heat the cup of water on high heat until it boils.  Reduce the heat to just below a boiling point, and add the agar while stirring rapidly. Agar melts at a very high temperature, but if you boil it you’ll lose some of the water you're melting it into (which will offset the ratio). If you have powder, add it all at once and stir until it seems to have melted/dissolved into the water. If you have sticks, break them off into little chunks (you can jam them in a food processor to make it quick) and do the same.
3. Combine the hot agar gel with the coconut milk and whisk thoroughly. Dump equal servings (about 1/4 cup) into each serving vessel, and place in the fridge to cool. Depending on your fridge temp; this should take not much longer than 30-60 minutes.  If desired, before serving, dust with cayenne and cinnamon.  Makes about 8-12 small servings.  


*

From a few days ago: this sunset --


...was reflected in and merged with some other celestial pyrotechnics.

Saturday, February 19, 2011

Homemade (Vegan) Thin Mints!

I have created thin mints!  There's a feeling of triumph in replicating a product so trademarked, so anticipated, so singular.  I also realized how much more decadent a chocolate-covered cookie is than a normal cookie (though the uncoated cookies were pretty good on their own).

With this recipe from Chloe Coscarelli, the taste but not exactly the texture of the thin mint was recreated.  I couldn't get the cookie quite crunchy enough, a texture that is really only desirable in relationship to the creaminess of the outer chocolate coating.  Doing something along the lines of this recipe from alien's day out, which uses oil instead of vegan butter, might help on the texture-authenticity front.  Still, no one was complaining about the slight softness of the cookies.

No cookie is safe.  Caramel delites / Samoas will be next.


Vegan Thin Mints
(from chef chloe)

Instructions
 wafer cookies:
1 1/4 c all-purpose flour (I used 3/4 c white, and 1/2 c wheat)
1 c sugar (I used 3/4 c)
1/2 c cocoa powder
1/4 tsp salt
1/4 tsp baking soda
3/4 c vegan margarine
3 TB nondairy milk
1 tsp vanilla extract
1/2 tsp peppermint extract
chocolate coating:
4 c dairy-free semi-sweet chocolate
2 TB vegan margarine
1 tsp peppermint extract

Instructions
Wafer Cookies: 
1. In a bowl mix together flour, sugar, cocoa powder, salt, and baking soda.  With a fork, cut in butter, then also add milk, vanilla, and mint extract.  Knead with your hands in the bowl for one minute.  Chill the dough in the refrigerator for 1 hour.
2. Preheat oven to 350* F and line two large baking sheets with parchment paper.  Remove dough from refrigerator.  Roll a heaping teaspoon of cookie dough into a ball and place onto prepared baking sheets, leaving about 3 inches in between each ball. Evenly flatten the dough with your fingertips so that it is about 1/4 inch thick and bake for 12-14 minutes. Let cool completely.
Chocolate Coating:
3. Melt chocolate chips and margarine over a double boiler or in the microwave. Stir in the mint extract and mix until smooth. Dip completely cooled cookies into the chocolate and remove with a fork, gently scrapping off excess chocolate using the side of the bowl. Or, spread a thin layer of the chocolate on top of the cookies. 4. Place cookies on a parchment-lined plate or tray and refrigerate until chocolate coating sets. Store in the refrigerator.  Makes about 3 dozen cookies.

Sunday, February 6, 2011

Mamool (Middle Eastern Butter Cookies)

For those who have been wondering, my brother Colin finally left Egypt this past Wednesday and is now back in the US.  I know he's bummed about having to leave his program, but given the way the last few days have unfolded it seems as though he picked a very good time to go.  It's also amazing how being in the right (wrong? no, I think right) place at the right time has resulted in a network news appearance (on ABC, in D.C.), a letter to the Atlantic, a mention on NPR, and a quote in the Chronicle of Higher Education.  He has also written a new post on his blog (seriously, check it out) about his experiences living five minutes' walk from Tahrir Square, from which he has allowed me to quote:

"while walking through Tahrir on Tuesday, a Muslim Brotherhood guy gave me a cookie. I tried to politely refuse, but when he insisted, I qualified, even though I'm American? He smiled and replied, especially because you're an American. Ad infinitum, this is the anecdote I will tell about the Brotherhood."

I use this anecdote in an admittedly rather tenuous connection to the rest of this blog post, as mamool is apparently more Lebanese than anything.  We can nevertheless celebrate the power of cookies--to welcome people into one's home, to seduce their hearts and souls, and perhaps to further international understanding.  In any case, it's a pretty great story.

I think I found this recipe a while ago when I was looking for new ways to use mazaher (orange blossom water).  And Oh. My. Goodness.  These are good cookies.  Buttery and flaky but not overly sweet, they're like a shortbread cookie with a decadent and aromatic filling.  The flavor of the orange blossom water is strong without being overwhelming, and I added some almond extract to the outside dough as a counterpoint to that flavor.  I wouldn't change anything about the recipe, but I definitely could improve on my method.  For one, a google image search has informed me that mamool are usually way prettier, thanks to the help of an elegant cookie-mold-thing.  Since that was out of the question, I experimented with different methods and shapes (samosa? turnover?) before realizing that the easiest and best looking way to do it was to flatten out small portions of the dough as much as possible (see below), then put a small amount of filling in the middle of the circle, pull up the sides of the circle around the filling, pinch it closed, and then roll it as if there were nothing inside at all.

A little bit fussy, but once I got the hang of it, it was alright.  The dough was too dry, however, and I had to add a few tablespoons more liquid (soymilk and/or water) in order to get a dough that could handle all this manipulation.  I'm guessing that the tradeoff was a slightly tougher cookie, but I'm not complaining.

No eggs were called for, but I did add some cornstarch, not only as a binder, but also because the original recipe called for farina, which appears to be a more processed wheat flour product.  And again, I also added almond extract, which is one of my favorite things in the world (exhibit b: amazing almond cookies).

I also discovered a new method for melting larger amounts of butter: less fussy and more energy-efficient than using a double boiler or the toaster oven, I put the butter in a metal bowl on a cookie sheet into the oven that was preheating anyway (see photo at right)!  I guess if you have a microwave this is less of a revelation, but I don't.

 
Mamool (Middle Eastern Butter Cookies)
(from cooks.com)

Ingredients
dough:
4 c white all-purpose flour
1 c sugar
1 TB orange blossom water (the original recipe suggests using rose water as a variation; I'd like to try this too)
1/2 tsp almond extract
1 1/2 c melted butter (I used Earth Balance)
1 TB soymilk, plus more as needed
*
filling:
2 c ground walnuts
1/4 c sugar
1 TB orange blossom water
2 TB butter, melted

Instructions
1. Combine filling ingredients and set aside.
2. To make the dough, combine flour, sugar, and butter; add milk and flavoring. Knead well. Form into small patties, flatten in palm of hand; fill with 1 teaspoon filling and close tightly (see above notes for more information about how I did this).  Poke each one with a fork (is this necessary?  I'm not sure, but I thought better safe than sorry).
3. Bake in 350* oven until lightly browned on the bottom (about 10 min), then broil until tops are lightly browned.  Watch them very closely under the broiler!  I burnt about six of them because I stepped away for a minute.  If desired, sprinkle with confectioners' sugar when cool.  Makes 2-3 dozen.